Showing posts with label garden. Show all posts

Sunday, November 4, 2012

Home-made Organic Pest Control for Plants

Last year I tried growing mint. I spent many hours picking caterpillars off the fragrant leaves and transferring them to other plants, but in the end I sacrificed the mint to the caterpillars and grew butterflies instead. This year I decided to try my hand at growing strawberries and I realized that I needed an effective way to get rid of pests like aphids and caterpillars if I wanted to eat any of my home grown berries.


Above: Aphid infestation on my strawberry plants. The aphids arrive overnight and cover the under sides of leaves within hours. The top photo isn't great quality, but it shows that aphids aren't particularly scary, just annoying.

I got my strawberry plants from a friend and unfortunately they each have some kind of problem so I'm probably going to have to toss the lot of them away at some stage. This turned out to be kind of a good thing 
because it means I'm a little more willing to experiment on these plants. So, spray bottle in hand I set about making a home brew to get rid of the aphids. This is what I came up with:

I filled a spray bottle with water, put in a drop of liquid soap and added about 5 drops each of lavender and citronella oils. The liquid soap is an emulsifier, which basically means that it will cause the oils to mix with the water. I've since made this home made pest repellent with dish washing liquid with no problems. I'm pretty sure any liquid soap will work for this mixture, but listen to your instincts - glittery liquid bubble bath probably wouldn't be a grand idea.
If you don't have these two essential oils on hand, there are a few other aromatherapy oils that chase off bugs, such as peppermint oil, lemongrass, lemon, eucalyptus and tea tree. The soap in the mixture also helps the oils to adhere to the leaves of the plants, making the insect repellent even more effective.


Above: Liquid soap, water, lavender oil and citronella oil, all mixed in a handy spray bottle.

As far as I can tell this mix hasn't killed the aphids, simply chased them off. I'm okay with that. I have nothing against aphids in general, I just don't particularly want them to destroy my favorite plants. This home made insect repellent is proving to be quite effective not just against aphids, but against caterpillars and beetles too. I'm not sure how bees feel about it - I'll keep an eye out and post if I spot any sickly looking bee ladies around my strawberry plants.

I've also been spraying this mix on my ornamental plants and herbs as a precautionary measure against insect problems. I'm fairly sure that it will help to prevent fungus and rot diseases too. The most effective way to use this spray is to spray liberally to dry plants, coating both the top and under side of the leaves. The plant should be dripping with the bug spray. Allow to dry and avoid washing the solution off during watering - rather water the ground around the plants directly. Apply the mixture every day until the insect problem is solved, and after that, spray about once a week to dissuade the critters from coming back.

You can also use this home made spray to discourage mosquitos and other biting insects by spraying on bare skin. You can also spray around windows and doors as a way to prevent insects from entering the home, or if you have  plants near your doors and windows, turn the plants into bug repellents by spraying with this solution.


Sunday, December 18, 2011

Succulent Bonsai Garden

My boyfriend gave me a bonsai for Christmas a few years ago. It was a good choice for a beginner bonsai keeper like myself, because it's a tough succulent that has a tenacious grip on life. It's called Crassula Sarcocaulis, though it's commonly known as Bonsai Crassula. If you're considering starting bonsai keeping, I'd recommend starting with Crassula.

Above: Crassula Sarcocaulis. Like all succulents, Crassula grows from cuttings. Each of those little branches could potentially be a future bonsai. 

I kept the succulent bonsai in its original dish for a year or so and then decided to give it a new home as part of a miniature garden. I began by taking the bonsai dish and placing it in a large planter dish (the bowl that catches the water below a pot plant). Then I filled the area around the bonsai pot with soil and added a few succulent cuttings. The result was a two-tiered garden, which you can see in the picture below. After about a year, I decided that I'd prefer the miniature garden to exist in only one dish, the larger planter dish.

Above: Equipment ready. Planter dish, plants, soil (under table), spray bottle and chopsticks (in my mouth. I'm still practicing the whole "being normal" malarky. Sometimes I forget...)


Above: Close-ups of some of the succulents and cactii for the miniature garden. I bought these from a couple at the Porter's Market in Tokai. They had a variety of interesting plants for sale at decent prices. Each plant has its own unique needs with regards to watering and fertilizing. Caring for a miniature garden is much the same as caring for a normal sized garden, except that everything is done on a much smaller scale.

I spent a while looking for inspiration online, but it seems that miniature gardens of this type are quite rare, so I fell back on the classic guideline of, "I'll put it where I want to."
I emptied out the planter dish and poured in a thin layer of fine gravel. I placed the uprooted bonsai into the dish and then filled the dish with potting soil, placing rocks around the base of the tree. I then tamped down the soil around the bonsai's roots pretty well. I didn't want any air channels to be caused by eroding soil, as the air would just dry out the roots.
After that, I started planting, using chopsticks to dig holes, place the cuttings into the holes and then cover the roots with soil. A lot of the cuttings were tiny, and the chopsticks gave me more control than fingers would. Eating utensils, gardening tools, same difference.

Above: The finished result. I placed rocks around the roots of the bonsai to support the soil and create a little "hill" for the tree to live in. I used moss to create a grass-like effect around the base of the bonsai.

 Above: About a year after planting, needing another trim. I've added a few plants, removed others and moved one or two to better spots.

 Above: I may have gone a bit OTT (Over The Top), my favorite method of doing anything. I love all the different colors in this one tiny pot. It really tickles my crazy bone.

Above: The miniature succulent bonsai garden looks spiffing on our porch table, and is a talking point for visitors.

Logically, moss and succulents shouldn't be able to thrive in the same container, because moss likes to be moist and cool, while succulents like to be dry and hot. But... life's too short for logic, so I did it anyway. I water mostly with a spray bottle, so I can control how much water each area gets. The different plants all thrive.
One of my favorite things about this bonsai tree is that it flowers almost all the way through summer with tiny, scented white blooms. The trunk is steadily becoming thicker, so over time it will eventually achieve a stumpy bonsai trunk.


Thursday, December 15, 2011

How To Grow Tillandsia Air Plants

Air plants are also called Epiphytes. These are plants that don't grow in soil, but grow hanging from trees or tucked into the nooks and crannies of rocks. There's one type of air plant that is very popular here in Cape Town. It's called Tillandsia. It's not an indigenous plant (it's originally from North and South America) but it does do well in our climate.


Above: Most Capetonians are familiar with the sight of Tillandsia air plants. These are usually grown suspended from tree branches, fences or trellises.

It's a fairly common belief that air plants draw nutrients from the air and therefore don't need water or fertilizer. This isn't true. Air plants draw nutrients from organic matter (leaves, flowers, insects etc) that get trapped between their leaves. Although they are fairly drought-hardy, air plants do need water, especially in South Africa's dry seasons. 
I water mine twice a week in summer and once every two weeks in winter, spritzing the plants with a spray bottle until the water drips off. Once a month in summer I'll put some fertilizer in water and soak the plants with this mix. 
My plants hang from a home-made bamboo frame on my porch, and don't receive rain water or direct sunlight. They seem happy enough in solid shade, though the leaves do seem to grow a bit longer in the shade than they did in a sunnier spot. Once a month or so, I'll take the frame off the wall and prop it up on the porch railing for a bit of late afternoon sunlight. (When we move, I'll find a permanent spot for my Tillandsia that is a little warmer and receives more sunlight.)
The best place for these plants is in full shade, under the protective branches of a tree or the overhang of a roof with strong reflected light. They need regular water, but don't respond well to being constantly wet (ie, they won't survive on the soggy ground next to a pond) Although they can withstand wind, Tillandsia is happier in a sheltered area.

Above: Tillandsia air plant on my home-made bamboo frame. 

I made my frame from "bamboo" (it's not really bamboo, but a local reed that has a similar structure). I cut the bamboo to size, sanded and cleaned it, and then tied it together with yarn. I varnished it to bring out the rich colors of the reed. Because the frame is protected from the elements, I didn't seal the cut ends with anything more permanent than a layer of varnish.
The clump of Tillandsia on my frame (see above picture) is actually made up of several small plants. These were given to me by a friend after a storm shredded her large Tillandsia. I connected the air plants to the frame with hooks twisted out of wire. It's a reliable method, but the plant does need to be checked every few years to ensure that the wire isn't choking the plant or disintegrating.

Above: The length and color of Tillandsia's leaves depends largely on how much light they receive. My plants are grown in solid shade, and therefore the leaves are longer and greener than those of plants grown in a sunnier area.

Tillandsia can also be grown in wire hanging baskets, or simply suspended from a beam. Don't plant tillandsia in soil, as this will lead to the plants rotting slowly and dying. They grow well in humid areas, such as bathrooms or above a water feature, just be sure not to over water air plants in humid areas.
One of the clumps flowered shortly after I received it. I haven't seen any flowers since then, but I'm hoping to see them again. They're beautiful, and well worth the wait. (If you have some tips for getting Tillandsia to flower, please comment below.)


Wednesday, November 30, 2011

DIY Bamboo Climber Trellis

I have a romantic relationship with climbing vines. They bring me flowers and I flatter them with shrieks of delight and hand-clapping while bouncing around on the spot (For a visual reference, see Oprah). My favorite climbers are jasmine, not just for the sweet-scented flowers, but for their color-changing leaves and hardy natures.
About two years ago, I crafted a large bamboo trellis for two jasmine vines that I had growing in pots. I was very pleased with it at first, that is, until I realized how shockingly awful it looked. (I've, erm, "lost" the photographs of this first trellis). Essentially, there was far too much trellis showing - it made the young vines seem woefully inept.

So, I tore down the large bamboo trellis and cut it into smaller pieces. In this instance the design advice "less is more" certainly applied. The smaller the bamboo trellis, the more easily the vine can overwhelm it, leaving only tantalizing glimpses of bamboo between the leaves.
I recycled as much of the trellis as I could, sanding and varnishing several pieces for future use. Here are some pictures of the process:

Above: The sanded trellis pieces, ready for varnishing. The weather during spring is unpredictable, so I worked under cover on the porch. Note the tea - no craft project is complete without being liberally lubricated with tea.

Above: A comparison of two trellis pieces, one unvarnished (top) and the other with a single coat of varnish (bottom).

Above: Even though I tied the bamboo poles together with wool, it has held up well to the elements. Small flakes of old varnish can still be seen to either side of the yarn.  

Above: I used wood filler putty to seal the reed ends. I'm sure there are better ways to do this, but as far as an on-the-spot thumb-sucking solution goes, wood filler has worked out okay so far. The picture on the left is of the seal without varnish and the picture on the right is after varnishing.

Above: The finished result. For now, I've just leaned the trellis against the wall, pending a move in a few months. I've planted Salvia in the front of the pot. The flowering season of jasmine is fairly short, but Salvia flowers near continuously when mature, giving the pot interest for many months of the year. 

Above: The red leaves of spring create a stunning contrast to the yellow of the bamboo reed and the bright green of the young leaves.

These little reed trellises fit in well with my EurAfriAsian-styled balcony. (My lover tells me it's eclectic. I call it indecisive.) The trellises offer a geometric contrast to the organic curves created by the plants and flowers. 
As a DIY project, this is one that I have thoroughly enjoyed, and I looked forward to the jasmine flowers wooing me this summer with their sweet scents.


Thursday, October 6, 2011

South African Summer Flowers

I love the local flora of South Africa. We have diverse and attractive flowers that are hardy and grow in a variety of environments. Every now and then, when I am overwhelmed by a frenzied urge for Pointlessism, I'll take the camera out into the garden, snapping pictures of flowers. These are some of my favorite indigenous South African plants.

Above: Yellow daisies. These grow wild in the farmlands around Cape Town, and flower from early spring through to the first truly hot day of summer.

Above: South Africa is home to hundreds of varieties of daisy flowers, that appear in a wide variety of colors. This purple daisy is a popular addition to Cape Town gardens. 

Above: The flowers on the left are not from an aloe, but share many similarities to the 'red hot poker' aloe flower.

Above: One of our most famous South African plants, the Strelitzia. These shoot out a handful of seeds as they open, and are reminiscent of birds with their yellow 'plumage' and red 'beaks'.

Wednesday, October 5, 2011

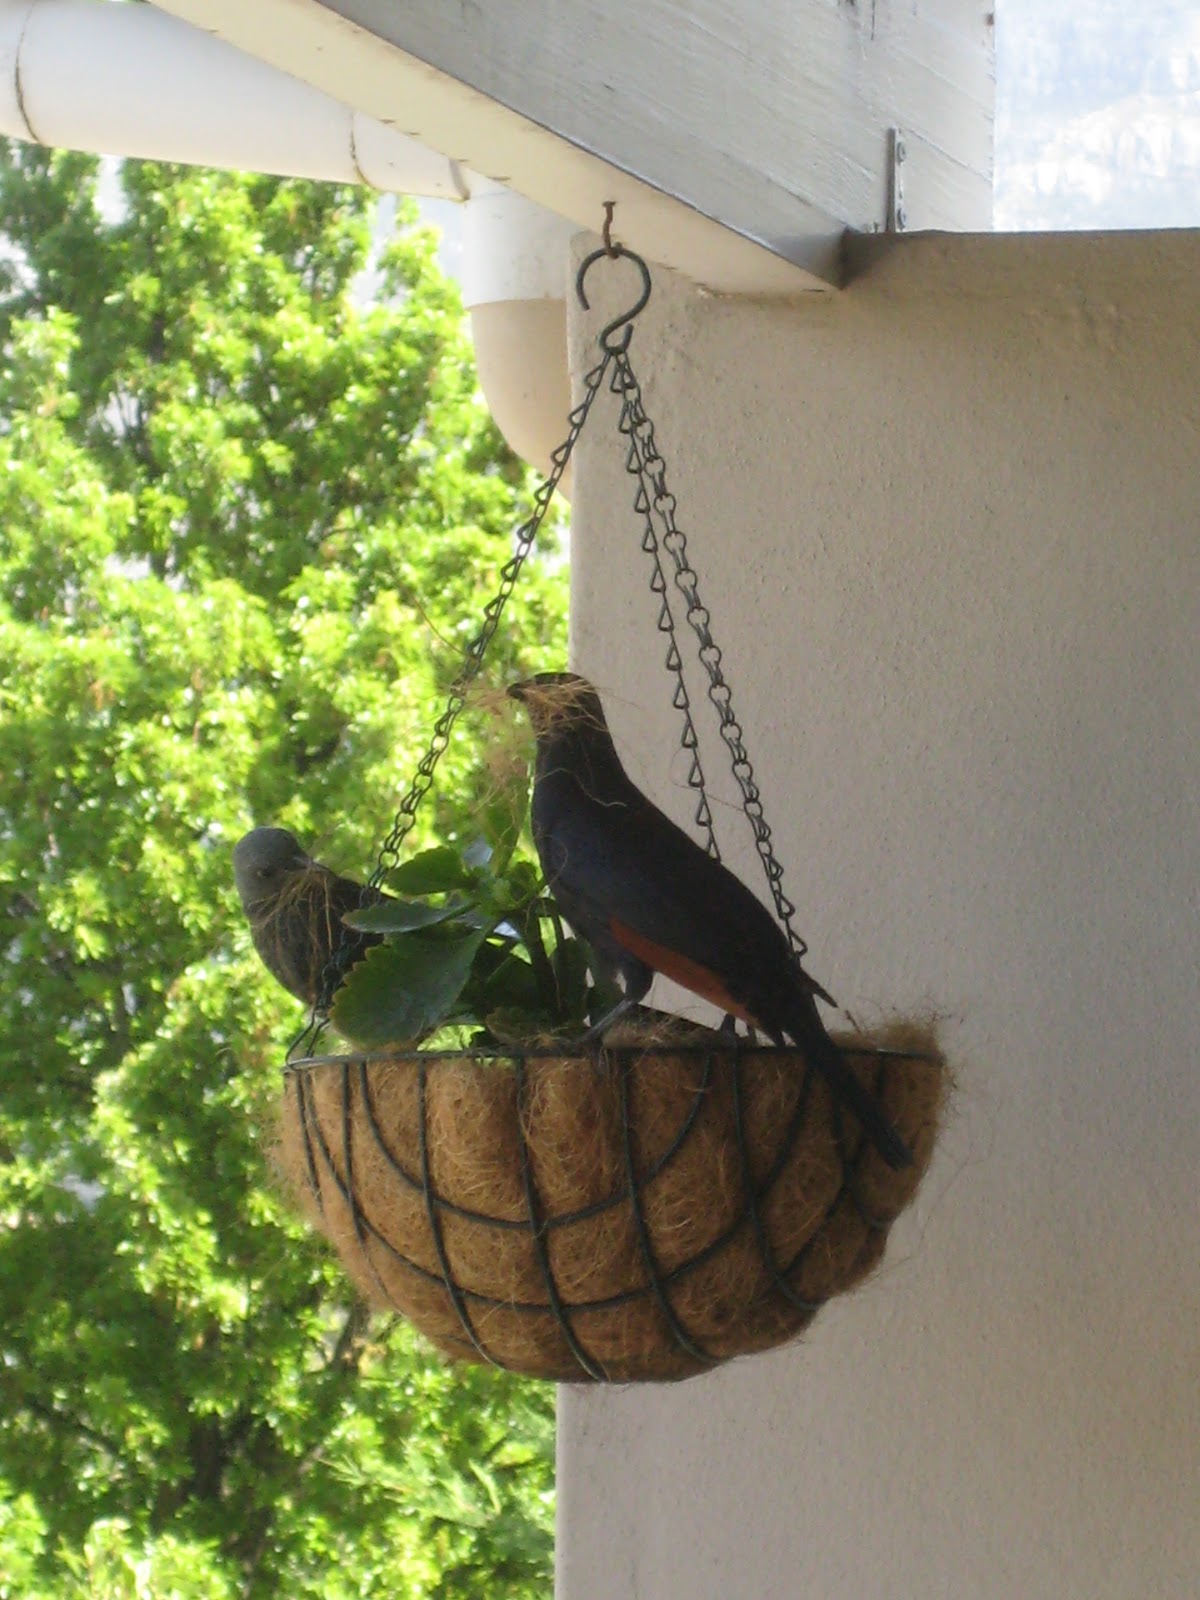
Redwing Starlings Nesting

These two Redwing Starlings are obviously nesting somewhere in the neighborhood. Every morning, they swoop in and land on a hanging basket on our porch, where they proceed to swipe the coconut coir that the basket is crafted from. 

Above: I don't know much about these birds, but it seems that both the male and female build the nest together. You can see in this picture how both starlings have coconut coir in their beaks. 

Above: Seeing these starlings pulling out pieces of coconut "hair" solves the mystery of the last year's disintegrating hanging basket. I suppose it built a whole village of birds' nests, so it went to a good cause.

Above: It's not an exciting video. In fact, for many people it will be 20 seconds of boring, but if you're interested, you can hear the call of the Redwing Starling. My film skills are such that I turned the camera off just as the birds flew away, the moment in which I might have caught a glimpse of the red color under the starling's wings that gives them their name.


Monday, September 26, 2011

A Non-Local Indigenous Plant?

When drought hit last summer, I rescued/liberated/swiped a few cuttings from some thirsty succulent plants that were growing near a driveway in the wine lands outside Cape Town. I popped the cuttings in a pot with some soil, watered them and did what most succulent growers do at this point - I let them be.
A few months on, the cuttings are thriving, especially the one pictured below. I've identified it as Aeonium Arboreum, and there appears to be some dispute as to this plant's origins.

Above: Aeonium Arboreum. The cutting has trebled in size in six months. It's not as tough as the majority of our drought- and sun-loving local succulents, which makes me suspect that it is indeed an exotic succulent.

Above: A close-up of Aeonium Arboreum. Each cluster of leaves is arranged in such a way that from a distance they can be mistaken for flowers. The bristles on the edges of the leaves are not prickly, but are slightly coarse. The red-brown leaf tips contribute to the visual profile of the succulent by "outlining" the leaf edges.

The few information sources I've found online seem uncertain about the origins of this succulent. Some say that it originates from the Canary Islands, others say they are native to East Africa. Wherever they may have evolved, these plants have taken root here in South Africa, and as long as they are grown in a sheltered, partially-shaded area of the garden, they behave much like our local succulent varieties and thrive.


Sunday, September 18, 2011

Caring for Chameleons

For several months, we had three chameleons living on our porch, Hissy, Bert and Slow Mo.

Above: Bert. He got his name simply because Slow Mo came along first, 
and with a name like that, needed a friend called Bert. 


Above: Hissy, the youngest of the three. 
Hissy got his name because if you went too close, he'd get a fright and hiss at you.
I'm not known for my subtle naming skills.

Above: Slow Mo. The most sociable of the three. 
If you went near him, he would happily climb onto you, whether you expected him to or not. 
Several times I discovered him on my shoulder, in my hair or on my arm.

After a few weeks, Bert and Hissy went walkabouts and didn't come back. I suppose they were looking for a place to call their own. Slow Mo lived with us for a few more months until he passed away. He was a real pleasure to watch. I especially enjoyed spraying the leaves near him and watching the pink tongue lap up the water. Every few days I would mash some fruit or meat and smear it on a twig. The mixture would start to rot, attracting insects for the chameleons to eat.

Here are a few more pictures of the chameleons, Hissy and Slow Mo:
(For some reason I have only one photograph of Bert. See above.)

Above: Hissy on my finger.

Above: Hissy the chameleon walks along the edge of a Hydrangea leaf.

Above: Slow Mo being sociable. A few moments later he climbed right onto the camera. 

Above: Slow Mo on a fern frond.

I've always been in love with lizards, especially geckos and chameleons. Having these three wild guests live with us of their own volition was intriguing. I look forward to finding more chameleons in the garden this year.

Friday, September 2, 2011

Spring!

I love spring; the sounds of baby birds screeching for more food, the sudden downpours, the bright green of young leaves erupting from deciduous trees, the look of confusion on the weatherman's face.
Here in Cape Town, there's a certain vibe that occurs in spring. It feels as though everyone "wakes up". It's hard to describe, actually, but there's a feeling of excitement at the onset of summer. Suddenly there are hints of coconut-scented suntan lotion, ice cream and braai smoke. Slowly, the bravest of us begin to bare some skin in anticipation of the bikini and board-short summer to come.

Here are some photos from the garden, from last year's summer and spring. It's still a little early for spring flowers this year, but when they start to show, I'll try to remember to take more photos. These are all South African plants.


Above: Iris

Above: Aloe 
Above: Desert Rose 
 Above: Agapanthus
 Above: Pelargonium (Relative of the Geranium)
Above: Daylily
 Above: Poor Man's Orchid
(In my opinion, the easiest orchid to grow. 
Intense red flowers almost all year round, propagates easily)
 Above: Freesia
 Above: Daisy
 Above: Daisy
 Above: Pincushion


Related Posts Plugin for WordPress, Blogger...