Showing posts with label craft. Show all posts

Thursday, January 19, 2012

Bean's Blanket


My sister-in-law is pregnant with her first child, a boy (currently nicknamed "Bean"), so I decided to crochet a baby blanket for him. I chose a wide variety of bright colors, and though I used a rainbow sequence, you'll see that I didn't rigidly stick to a color pattern.
The crochet pattern is very easy, and works well for a baby blanket because it doesn't have lots of gaps for teeny weeny baby toes to get caught in.


Crochet Pattern for Bean's Baby Blanket:

Chain an uneven number
Row1: Work 1 SC (single chain) in 2nd ch from hook and in each ch to end. Ch1, turn.
Row 2: Working through the front loop only, work 1 SC in 1st and each ch to end. Ch1, turn.
Repeat row 2 for pattern.

I used a combination of synthetic yarns and crochet cotton. Because of the different thicknesses of the yarns, I had to be careful to use the thin cottons in a sequence (every 4th row), to avoid the finished product being unevenly weighted.

Above: Every 4th row is cotton, to keep the weight as even as possible. Not all of the synthetic yarn is the same thickness, though. Note how thick the dirty pink is (left of the middle of the photo), compared to the orange next to it. Altogether, the texture is very interesting.

Above: By turning the blanket over after completing each row, there is no '"front" or "back" on the blanket. 

To finish, I used the same stitch to make a border of 6 rows. I debated putting tassles onto the blanket but decided to leave these off, because I didn't want Bean's little nose to be tickled by them. I'm hoping that this will become a real drag-around kind of blanket.

Hope you enjoy your blankie, Bean!

Friday, December 16, 2011

Beautiful Antique Japanese Door

After seeing this door, I decided to share some pictures of it. The history of the door has been lost, sadly. All I know is that it is probably more than a century old, from Japan, and it was carved and painted by hand. 


Above: The double doors include barred windows, that allow light and air to circulate. The height of the doors contribute to the effect of grand elegance that the doors possess.

Above: The gold paint creates an interesting, attractive contrast to the brown paint used as a base coat on the door. This photo illustrates the aged look that is caused by the flaking paint.

Above: The hand carving is exquisite, with each part of the design perfect. A lot of care and concentration went into the crafting of this door.

Above: Bird and flower designs create organic curves that seem animated against the stiff, geometric shapes of the door.

This antique Japanese door has a lot of character, and draws a lot of attention. So it should, because the craftsmanship is exceptional, worthy of being admired on a daily basis. This is a beautiful example of art serving a functional purpose.


Wednesday, November 30, 2011

DIY Bamboo Climber Trellis

I have a romantic relationship with climbing vines. They bring me flowers and I flatter them with shrieks of delight and hand-clapping while bouncing around on the spot (For a visual reference, see Oprah). My favorite climbers are jasmine, not just for the sweet-scented flowers, but for their color-changing leaves and hardy natures.
About two years ago, I crafted a large bamboo trellis for two jasmine vines that I had growing in pots. I was very pleased with it at first, that is, until I realized how shockingly awful it looked. (I've, erm, "lost" the photographs of this first trellis). Essentially, there was far too much trellis showing - it made the young vines seem woefully inept.

So, I tore down the large bamboo trellis and cut it into smaller pieces. In this instance the design advice "less is more" certainly applied. The smaller the bamboo trellis, the more easily the vine can overwhelm it, leaving only tantalizing glimpses of bamboo between the leaves.
I recycled as much of the trellis as I could, sanding and varnishing several pieces for future use. Here are some pictures of the process:

Above: The sanded trellis pieces, ready for varnishing. The weather during spring is unpredictable, so I worked under cover on the porch. Note the tea - no craft project is complete without being liberally lubricated with tea.

Above: A comparison of two trellis pieces, one unvarnished (top) and the other with a single coat of varnish (bottom).

Above: Even though I tied the bamboo poles together with wool, it has held up well to the elements. Small flakes of old varnish can still be seen to either side of the yarn.  

Above: I used wood filler putty to seal the reed ends. I'm sure there are better ways to do this, but as far as an on-the-spot thumb-sucking solution goes, wood filler has worked out okay so far. The picture on the left is of the seal without varnish and the picture on the right is after varnishing.

Above: The finished result. For now, I've just leaned the trellis against the wall, pending a move in a few months. I've planted Salvia in the front of the pot. The flowering season of jasmine is fairly short, but Salvia flowers near continuously when mature, giving the pot interest for many months of the year. 

Above: The red leaves of spring create a stunning contrast to the yellow of the bamboo reed and the bright green of the young leaves.

These little reed trellises fit in well with my EurAfriAsian-styled balcony. (My lover tells me it's eclectic. I call it indecisive.) The trellises offer a geometric contrast to the organic curves created by the plants and flowers. 
As a DIY project, this is one that I have thoroughly enjoyed, and I looked forward to the jasmine flowers wooing me this summer with their sweet scents.


Friday, October 7, 2011

Peruvian Alpaca Clothing

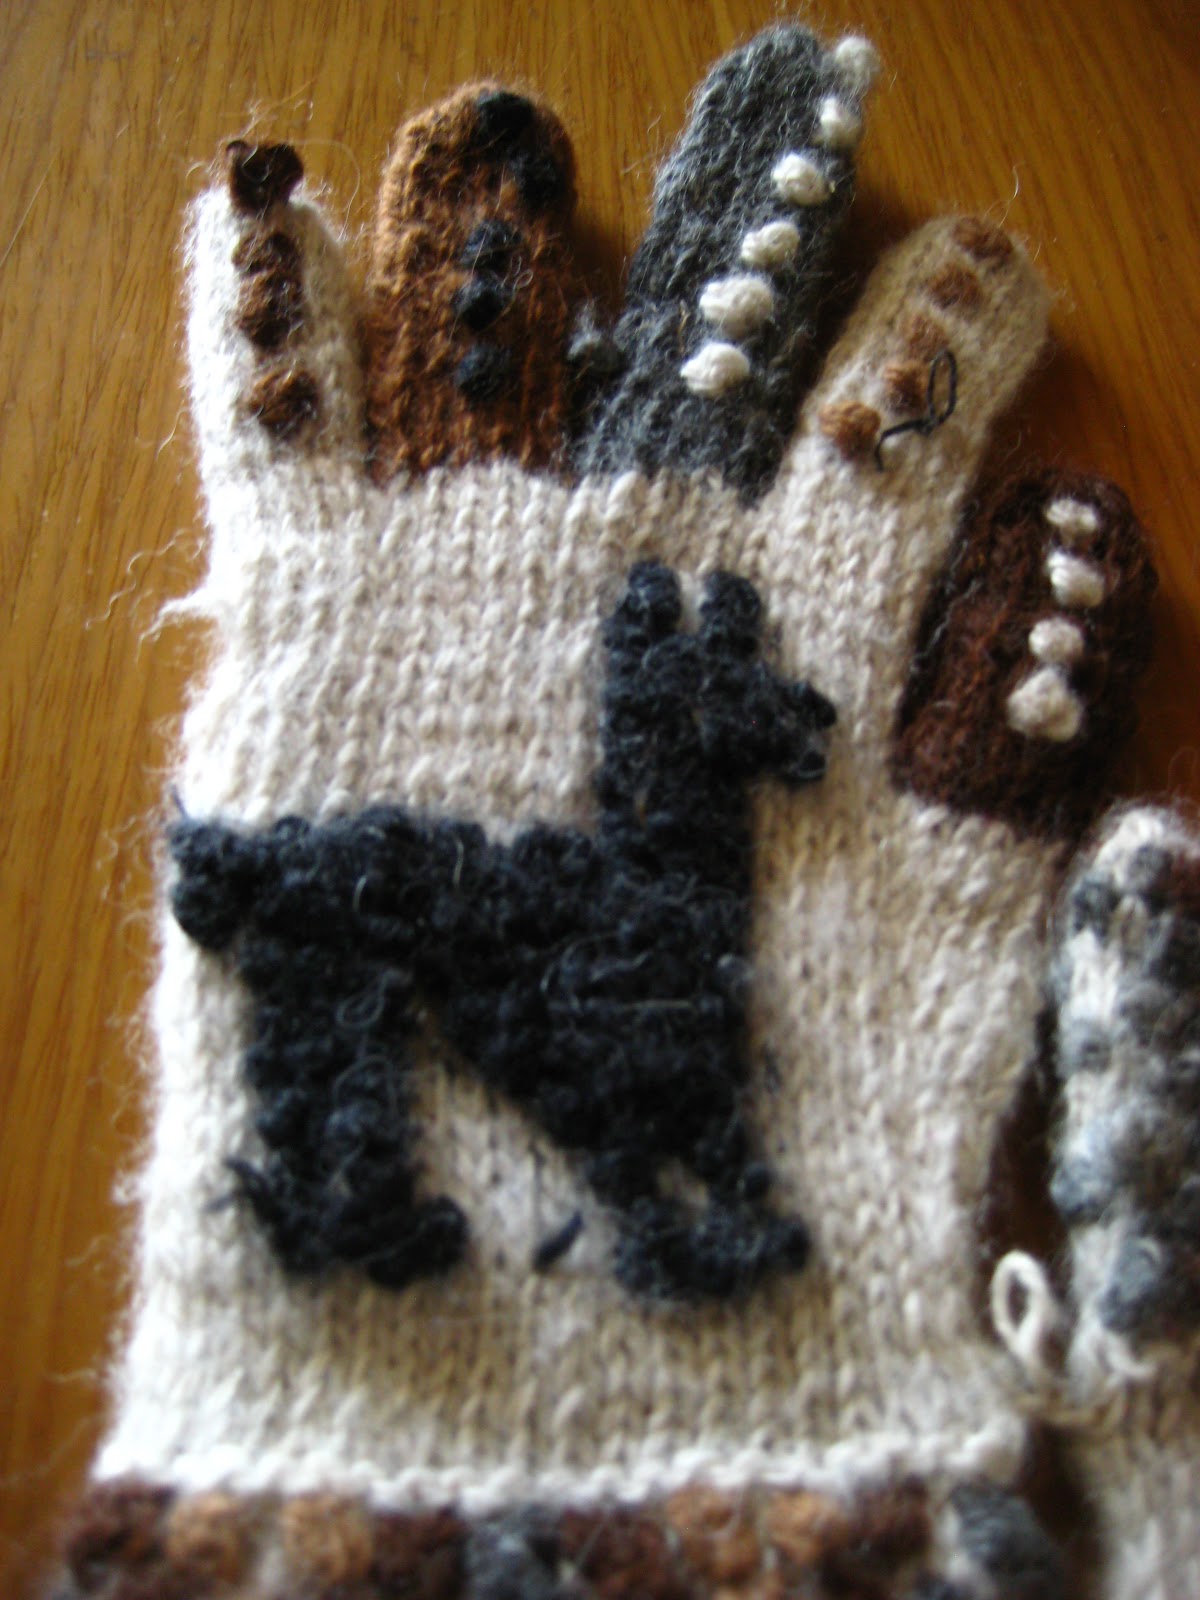
I love coming across hand made products from other countries. These belong to some friends of mine, who recently visited Peru. The fiber hasn't been dyed, so the colors are the natural colors of the animal fiber. These beanies and gloves have been hand-knitted on cactus needles.

Above: Skilled crafters have created textures and interest by adding "popcorn" to the knit pattern. 


Above: The fun alpaca designs that have been worked into these gloves will appeal to children and adults alike. There are hundreds of natural shades of alpaca fiber, and when used together, as above, these natural tones are vibrant and appealing.

Above: Alpaca fiber is warmer than sheep's wool, and depending on the quality, can be softer than any other natural fiber. 

I've been planning for years to take up knitting, so I don't know too much about the craft, however, I think the "popcorn" effect may have been created with a crochet hook, after the completion of the knitted item.


Tuesday, October 4, 2011

Work in Progress: Raad Baby Blanket

Reading copious amounts of Terry Pratchett has given me a soft spot for puns. This particular pun is a play on my friend's surname, Raad, and the slang term, "rad". She's pregnant, and the crochet blanket will be a gift to her child, becoming a Raad blanket. Get it? Get it? Oh, man, I crack myself up.

Above: The Raad blanket uses the classic granny square crochet design.

Above: Each square has a silver border, so that I can hide the join easily by using silver crochet yarn when attaching them.

Above: I chose to use opposite arrangements of light and dark colors. This creates both balance and interest in the design.

 Above: The crochet baby blanket is crafted using bamboo yarn (yup, you guessed it, from my favorite yarn maker - Vinni's). The bamboo crochet yarn is incredibly soft, has a nice weight and a lovely sheen. A color that would have been grey in any other yarn, becomes silver, because of the sheen of the bamboo yarn. I think it's going to turn out beautifully.

I'm using a no.4 crochet hook, with a double stitch. For each row, I turn the piece over, so that there is no "front" and "back" to the square. On the third, fourth and fifth rows (counted from the center), I crochet into the top of the stich, instead of the big gap between the stiches. This gives the blanket even more fluidity of movement. 
A word of advice for crocheting with bamboo yarn; take it slow and hide your cut ends. Mistakes wrought in this yarn are highly visible and it can be frustrating to go over each square looking for shaggy ends and missed threads.


Wednesday, September 28, 2011

Work in Progress: Car Seat Quilt

I've been rattling forth with My Very Own Bernina Sewing Machine. So far I've completed one beginner sewing project, Matilda's Curious Quilt. I was surprised at how quickly I completed the little blankie, because I've become accustomed to the months of work that crochet blankets need. I decided to tackle a slightly larger, and more complex craft project; a quilt to cover the back seat of the car.

Above: Cut and ready to sew. I chose the cheapest material available at the fabric shop. This way, if I make a major boo-boo, it won't break the bank. The cloth seems to be a hybrid of synthetic and extra-terrestrial threads, prone to suddenly floating away on an invisible cloud of static, before trying to suffocate the iron by melting itself to the iron's surface. 

Sewing has, so far, not been an easy sport for me.

Above: Planning is not a strength of mine. This is what my attempt at being organized looks like (Note at the bottom left; the detailed plans for the border). Of course, as with all of my craft projects, the design has changed along the way and looks nothing like the plan.

Above: I decided to open up the seams and iron them flat, to prevent unsightly folds along the seams. It's time-consuming, but the finished result is nice.

Above: As a beginner quilter, I'm not quite at the stage of lining up the print with the seam. I don't think Matilda will mind. :)

Above: I decided to separate the squares of color with navy blue (not in the original plan. Note the rolling of eyes). I muddled up my measurements a little. The large, single fabric squares are slightly smaller than the joined fabric squares. I'd joined all of the pieces before it dawned on me that something was awry. I took the live-and-learn approach and figured out a way to continue.

Above: The center piece of the quilt, complete. This was as far as I was going to take the quilt in the original design, but I've decided to add a few borders of randomly-placed scraps of cloth. I'm hoping to soften the uniformity of the quilt's center with the uneven borders.

As far as hobbies go, I think quilting is way up there for me, although that may just be beginner's enthusiasm. The craft poses lots of little challenges and there is constantly room to improve. I'm looking forward to gathering up scraps of cloth to stitch into odd-ball quilts.

.

Thursday, September 15, 2011

My Very Own Bernina Sewing Machine

Matt and I drove through to Hermanus today, to buy the 1968 Bernina 707 Minimatic. I was so excited that I cut material to practice on and transformed my work table in preparation for the sewing machine.

Above: Scraps of material to practice on (left), and material cut for a little quilt for Matilda (right), Plants and music complete the working environment.

The machine is in fantastic condition. It has a couple of little scratches, but impressively, even though one or two of them expose the metal, these areas show no sign of rust. This is the sturdy, reliable work-horse of a sewing machine that I was craving. Here are some pictures of the machine. Permission to drool granted.

Above: She's not a large machine, but she's pretty heavy 
(probably all the good solid metal that she's made out of.) 
The carry case is marvelously sturdy - I didn't worry a bit about it sharing the backseat with Matilda, our Scottish Terrier.
Featured on itsablogparty.com

Above: The machine came with a number of original items, such as the original storage box, filled with the original feet, bobbins and even the original slip of material that gives an example of each stitch that the machine is capable of. I was very excited to discover that the embroidery foot was included. Sadly, the manual has been lost over the years. (Anyone with a Bernina 707 Minimatic Manual please contact me.)

Above: I've never seen a bobbin like this one before. Isn't it sweet? I'm not sure what the BB engraved on it stands for. Perhaps Bernina Bobbin? 

Above: After practicing a little, I got the hang of it and started working on Matilda's quilt.

Even though the Bernina hasn't been serviced in a while, she runs incredibly smoothly. This is a quiet, hard-working machine. On my first day of using it, I was sewing through several layers of pretty thick material without even a murmur of complaint from the machine. If you're looking for a beginner sewing machine, I recommend an older Bernina. They truly are a pleasure to work with.

Looking for Beginner Sewing Tips?
Try these books for some advice.


Wednesday, September 14, 2011

A Sewing Escapade

A little while ago I started hankering after a new skill; sewing. I started with hand embroidery to get a feel for the craft, but after spicing up a few items of clothing with lace, sequins and embroidery, I realized that it was time to take the craft more seriously.
I borrowed my granny's old machine (an Empisal Cresta 999A) from my sister and gave it a test run. It was a little too advanced for me. The tension was provided by a little wire attached to a knob on the front of the machine (which I kept catching my hair on) and the foot pedal was so sensitive that several times I felt as if I was going to be dragged off my seat and under the needle. I was a bit timid to fiddle with machine, but oiled it with such enthusiasm that the machine spat and sputtered as I worked.

 Above: Granny's old Empisal Cresta sewing machine. 
It's missing quite a number of bits and bobs, 
but being an older machine, it still runs strong.

Above: The little wire tension knob thingamajig. 
I had nightmares about this apparatus rendering me bald. #justsharing

It was then decided, between my boyfriend and I, that it was time for a machine of my own. Something sturdy, reliable and tough enough to endure the inexperience of a novice seamstress like myself. I hopped online, full of chirpy optimism about buying a new machine and crashed and burned a few minutes later.
It would appear that sewing machine manufacturers no longer produce basic, sturdy machines. Each machine I came across had more bells and whistles than Santa Claus's sleigh and in order to own one, one must sacrifice a kidney or two and possibly a lung. It was frustrating, to say the least.

I continued digging around, more out of determination than optimism. What I discovered is that Bernina, Singer, Elna and Janome are known to be the best sewing machines (that list is in no particular order, and it will probably vary according to what sources you use for research). Bernina and Elna are quite popular here in South Africa, so I started looking for second-hand machines. My idea was that the older models of sewing machines (made of good, solid metal) will be sturdier than the modern machines, which contain too many plastic parts for my liking.

I came across an advert for a 1968 Bernina 707 Minimatic. I fell in love... We're headed out to Hermanus soon to buy her. :)

Above: The gumtree advert for the 1968 Bernina 707 Minimatic

Sunday, September 11, 2011

"Autumn Morning" Crochet Scarf

A friend of mine just turned 25 (for the 6th year in a row). I don't usually make a big deal of my friends' birthdays, but once in a while I like to do something nice. So, for his birthday this year, I decided to make him one of his favorite fashion accessories - a scarf.

Above: I chose autumn colors because he mostly wears orange, green or blue clothing. The brown has a slight magenta hue to it, complimenting the cooler colors beautifully. I used a bamboo yarn (details below), which has a lovely shimmer to it. It's very soft and smooth, making it a bit tricky to work with, but the finished result has a lot of flexibility and a comforting weight to it. 

Above: The pattern uses stitches that cross over each other, creating extra texture in the crochet. Although I like to use a variety of colors in my crochet projects, I think this stitch might look best if crafted in one color.

Crochet Pattern for "Autumn Morning" Crochet Scarf

Chain a multiple of 6 plus 5

Row 1: Crochet 1 sc (single chain) in 2nd chain from hook and in each chain to the end. Chain 1 and turn.
Row 2: Crochet 1 sc in the first sc, *skip 1 sc, 1 dc in next sc, 1 dcin skipped sc, 1 sc in each of next two sc. Repeat from * to end, ending with 1sc in last sc. Chain 2 and turn.
Row 3: Skip first sc, 1 sc in each of the next 2 dc, *skip 1 sc, 1 dc in the next sc, 1 dc in skipped sc, 1 sc in each of next 2 dc; rep from *, ending 1 dc in last sc. Chain 1 and turn.
Row 4: 1 sc in first dc, skip next sc, 1 dc in next sc, 1 dc in skipped sc, *1 sc in each of the next 2 dc, skip 1 sc, 1 dc in next sc, 1 dc in skipped sc; repeat from * to end, ending with 1 sc in the top of the turning chain. Chain 2 and turn.

Repeat rows 3 and 4 to create the pattern.

Above: The finished crochet scarf. I added tassles (knotting the ends to prevent tangles) as a contrast to the crochet pattern. 

I used Vinni's cottons' 100% bamboo yarn (Serina), and a 5.5 crochet hook. I used a size 7 crochet hook for the starting chain to prevent that edge being tighter than the body of the scarf. (See more on this method here)
I wouldn't recommend such a smooth, soft yarn for a beginner crochet project, as it can be a bit tricky at times. A similar result can be crafted with cotton yarn, which has more 'grip' and is easier to work with.

Interested in the craft of crochet? Check out Guerrilla Yarn Artists combine Graffiti and Craft for inspiration


This Blog Parties!
BWS tips buttonThe DIY Show OffThe Shabby NestThirty Hand Made Days
freckled laundryIt's a Blog Party
Related Posts Plugin for WordPress, Blogger...